Block Plans for Planning Applications: What Architects Need to Get Right
28 May 2026
A block plan for planning applications is not usually the drawing that anyone gets excited about. It is not the concept design, the elevations, or the glossy visual that helps a client understand the finished project.
But it matters.
For many planning applications, the block plan is one of the first drawings a local planning authority checks. If it is at the wrong scale, missing the red line, cropped too tightly, or based on poor mapping, the application can be held up before it has even properly started.
For architects, technicians and planning consultants, the aim is simple: produce a clear, correctly scaled drawing that shows the site, the proposal and the immediate surroundings. Do that properly, and the block plan becomes a straightforward part of the submission rather than a source of annoying validation queries.
This guide explains what a block plan for planning application use needs to show, what scale it should be, and the common mistakes worth avoiding.
What is a block plan?
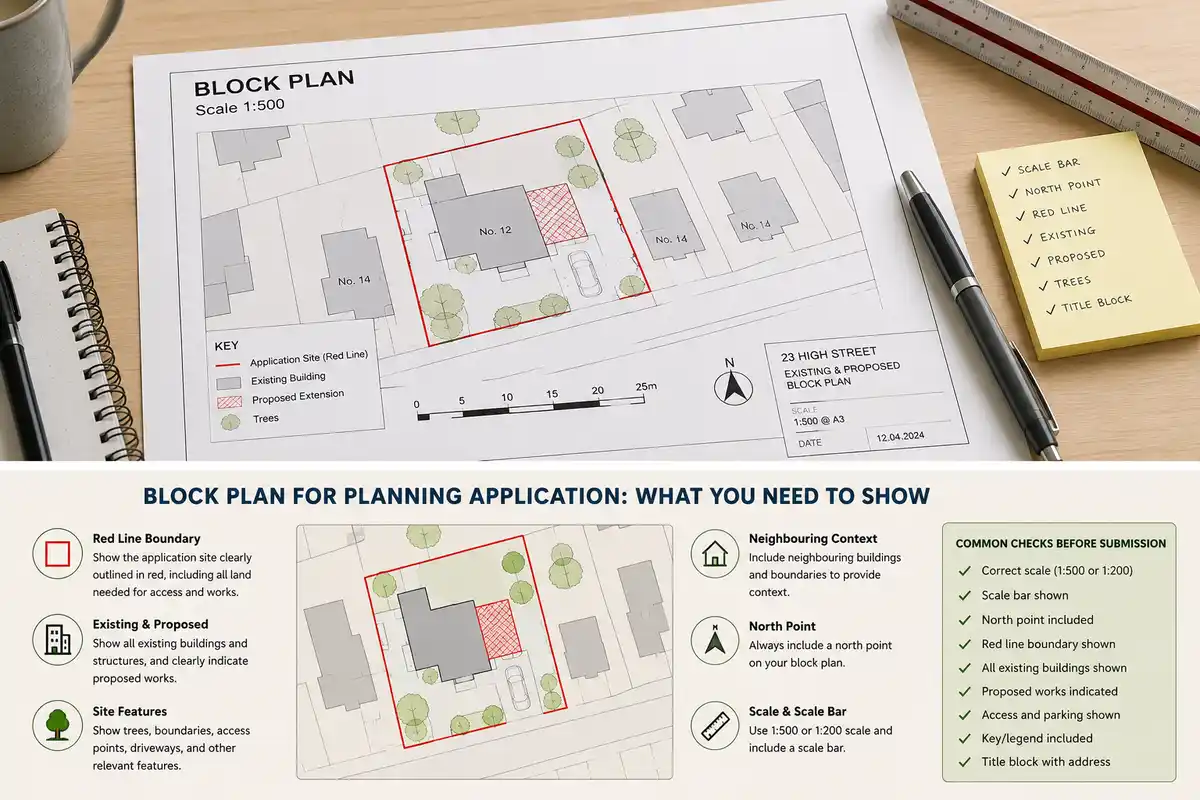
A block plan, sometimes called a site plan, is a scaled drawing showing the application site in detail.
It sits somewhere between a location plan and the main architectural drawings. The location plan shows where the site is in the wider area. The block plan zooms in and shows how the proposal relates to the plot, the boundaries, neighbouring buildings, access and key site features.
For a domestic extension, the block plan might show the existing house, proposed extension, garden, driveway, neighbouring properties and boundary lines. For a larger project, it may also show parking, refuse storage, cycle spaces, landscaping, trees, access routes and service areas.
The point is not to show every construction detail. The point is to help the planning officer understand the site layout.
What scale should a block plan be?
Most block plans are prepared at 1:500 or 1:200.
For many standard householder and small commercial applications, 1:500 is the usual scale. A more detailed site plan may be needed at 1:200, particularly where the site is small, tight, complex or where the relationship with neighbouring properties is important.
The scale should be stated clearly on the drawing, and the plan should include a scale bar. This sounds basic, but it is one of the easiest things to get wrong, especially when drawings are exported to PDF and resized.
A drawing can say “1:500” in the title block and still not actually print at 1:500 if the PDF has been scaled to fit the page. That is why a scale bar is useful. It gives the planning officer and anyone else reviewing the drawing a visual check, even when the plan is viewed digitally.
Before submitting, it is worth doing a quick sense check. Measure a known feature on the plan, such as a driveway width, garage door, or building length. If it does not stack up, fix it before the LPA spots it.
What should a block plan show?
The exact requirements vary slightly between local planning authorities, but most block plans need to show the same core information.
A good block plan will normally include:
- The application site is outlined in red
- existing buildings on the site
- proposed buildings, extensions or works
- neighbouring buildings close to the boundary
- site boundaries
- access points and driveways
- paths, parking and turning areas where relevant
- trees and important landscape features
- north point
- scale bar
- drawing title, site address and scale
- a clear key or legend where existing and proposed features need to be distinguished
For simple household work, the plan does not need to be overcomplicated. But it does need to be clear. The planning officer should be able to glance at it and understand what exists, what is proposed, and how the proposal sits within the site.
That is the job of the block plan.
The red line boundary
The red line boundary is one of the most important parts of the drawing.
It shows the land included in the application. That usually means more than just the footprint of the proposed building or extension. It should include all land needed to carry out the development and make sense of the proposal.
For example, the red line may need to include:
- the existing building
- the proposed extension or new structure
- garden or yard areas affected by the proposal
- access routes
- parking or turning areas
- drainage or service routes where relevant
- any land physically required for the works
A common mistake is drawing the red line too tightly around the proposed works. On a rear extension, for instance, the red line should usually include the wider property or relevant application site, not just the extension footprint.
Another mistake is including land that the applicant does not own or control. That can trigger ownership certificate issues and additional notices.
The simple rule is this: the red line should match the land the planning permission needs to cover. Not more for the sake of it, and not less because it looks neater.
Block plan, site plan and location plan: what is the difference?
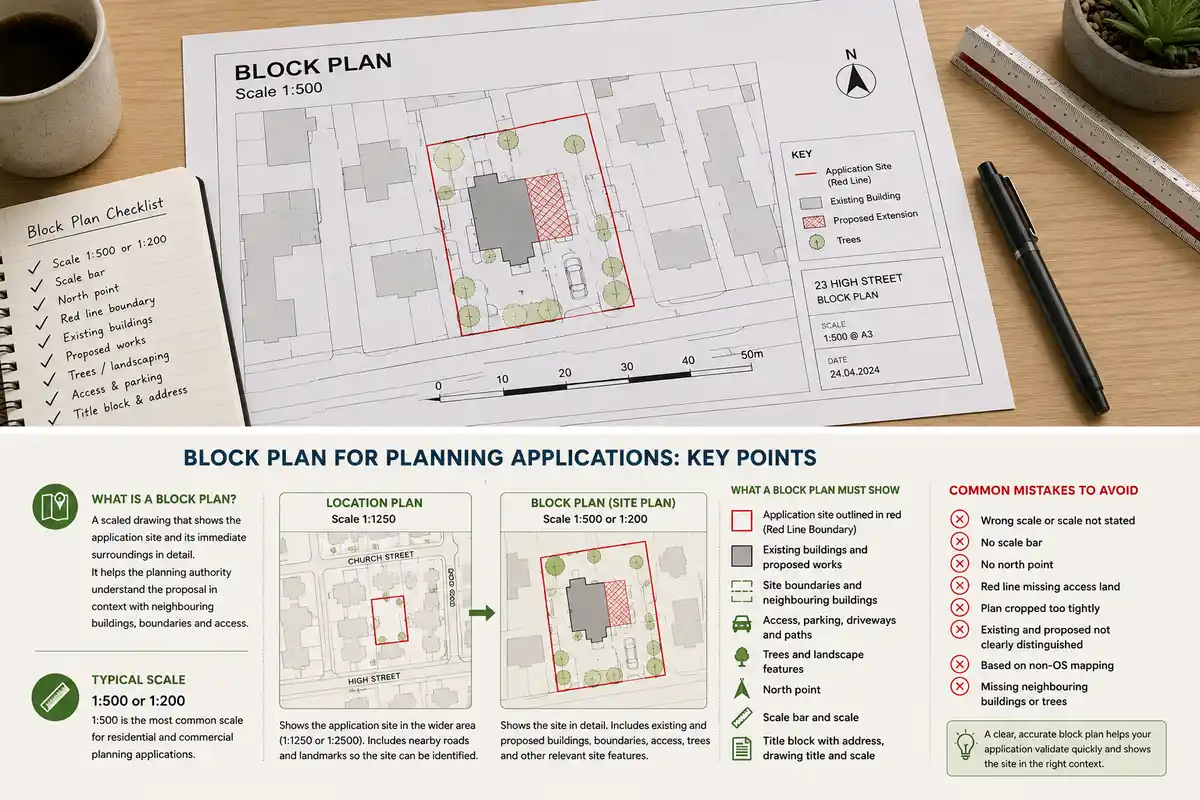
The terminology can be irritating because different councils use slightly different wording.
A location plan usually shows the site in its wider setting. It is commonly prepared at 1:1250 or 1:2500 and should show enough surrounding roads and buildings for the site to be identified.
A block plan shows the site in closer detail, usually at 1:500 or 1:200.
A site plan is often used to mean the same thing as a block plan. Some local planning authorities ask for a “site plan at 1:500”. In most cases, they mean the detailed plan showing the application site, boundaries, access and proposed layout.
So, in practice:
| Drawing | Usual scale | Main purpose |
| Location plan | 1:1250 or 1:2500 | Shows where the site is |
| Block plan / site plan | 1:500 or 1:200 | Shows the site layout in detail |
If the LPA checklist asks for both a location plan and a block plan, submit both. If it asks for a site plan, check the scale and content requirements carefully.
Why the base mapping matters
The base map is not just background decoration.
For planning work, block plans should be prepared on accurate Ordnance Survey mapping. That gives the drawing a reliable base for buildings, boundaries, roads and surrounding context.
Using screenshots from Google Maps, Bing imagery or estate agent plans is risky. They may look fine at a glance, but they are not the right base for a formal planning drawing. They can be out of date, distorted, not properly scaled, or missing important boundary detail.
For architects, the usual starting point is OS-derived mapping, often based on OS MasterMap data. This gives a cleaner and more defensible base for drawing the red line, placing the proposed works and showing the relationship to neighbouring sites.
It also looks more professional. Planning officers see hundreds of applications. A proper OS-based block plan is much less likely to raise questions than a plan traced from a screenshot.
PDF, DWG or DXF?
The right format depends on your workflow.
For a simple application, a ready-to-use PDF block plan may be enough. This is common for homeowners, small builders and straightforward planning submissions.
For architects and designers, CAD files are usually more useful. A DWG or DXF can be imported into AutoCAD, Revit or other design software, allowing you to draw the red line, proposed layout, annotations and title block properly.
A typical workflow might be:
- Order the OS base map for the site
- Import the DWG or DXF into CAD
- Draw the red line on a dedicated layer
- Add proposed works and any relevant annotations
- Set up the sheet at 1:500 or 1:200
- Export to PDF for submission
That process gives you more control than working from a flat PDF, especially when revisions are likely.
Where to source a block plan
Architects who prepare planning submissions regularly need a reliable source of OS-based mapping.
PlanningMapsUK provides block plans for planning applications using Ordnance Survey data, including 1:500 plans for sites across the UK. The maps can be ordered per project without needing an annual OS licence or mapping subscription, which makes them useful for smaller practices, sole practitioners and project-by-project planning work.
Depending on the workflow, the mapping can be used as a ready-to-submit PDF or as a CAD base in DWG or DXF format.
Before ordering, check:
- The exact site address or postcode
- The local planning authority requirements
- Whether you need 1:500 or 1:200
- Whether you need PDF, DWG or DXF
- How much surrounding context should be included
- Whether the red line and blue line need to be drawn
- Whether the drawing will be edited in CAD before submission
A little preparation here prevents the classic problem of ordering a map that is technically correct but not quite useful enough.
Common reasons block plans fail validation
Most block plan problems are avoidable. The same issues come up again and again:
- The plan is at the wrong scale
- The scale is not stated
- The PDF has been resized
- There is no scale bar
- there is no north point
- The red line boundary is missing
- The red line misses access land
- Existing and proposed works are not clearly distinguished
- Neighbouring buildings are not shown
- Trees or important site features are missing
- The plan is based on non-OS mapping
- The drawing is cropped too tightly
None of these are complicated, but any one of them can slow the application down.
A quick pre-submission check is worth doing before anything goes through the Planning Portal.
Handling revisions
Block plans often change during an application.
A planning officer may ask for a clearer access layout. A neighbour’s objection may lead to a small design change. The client may alter the parking arrangement. Even a minor shift in the proposed footprint can mean the block plan needs to be updated.
When that happens, treat the block plan like any other controlled drawing. Use a revision letter, update the title block and make sure the superseded version is clearly replaced.
This matters because the approved drawings form part of the planning permission. Months later, when someone is checking what was approved, the block plan needs to be clear. Nobody wants three versions of the same drawing floating around with no obvious current version.
A simple block plan checklist
Before submitting, check that the plan includes:
- correct scale, usually 1:500 or 1:200
- scale bar
- north point
- site address
- red line boundary
- existing buildings
- proposed works
- neighbouring buildings where relevant
- access and parking where relevant
- trees and landscape features where relevant
- clear distinction between existing and proposed
- OS-based mapping
- drawing number and revision where appropriate
This is not glamorous work, but it is the kind of basic drawing discipline that keeps applications moving.
Final thoughts
A block plan for a planning application submission does not need to be complicated. It needs to be accurate, clear and correctly scaled.
For architects, the easiest way to get it right is to start with proper OS base mapping, show the red line carefully, include the necessary site details and check the exported PDF before submission.
Done well, the block plan becomes a quiet but important part of the application package. It helps the planning officer understand the proposal, reduces validation queries and gives permission a clear spatial record.
That is worth getting right at the start.
Comments on this guide to Block plans for planning applications: architects article are welcome.
Glasgow Buildings

Key Buildings in Scotland Articles
Historic Glasgow : best Glasgow architecture of the past
Comments / photos for the Block plans for planning applications: architects advice page welcome.